Integrate Custom Authentication
This page shows how to create a custom authentication module using packages, which allows you to reuse the same module across different applications to authenticate users efficiently.
Prerequisites
- A package that has already been created. For more information, see Package and query modules tutorials.
- An authenticated datasource with user sign-in endpoints.
Configure package
To secure your Appsmith application, you will need to set up a sign-in flow that requires users to authenticate before accessing the app. Follow these steps to create the sign-in flow:
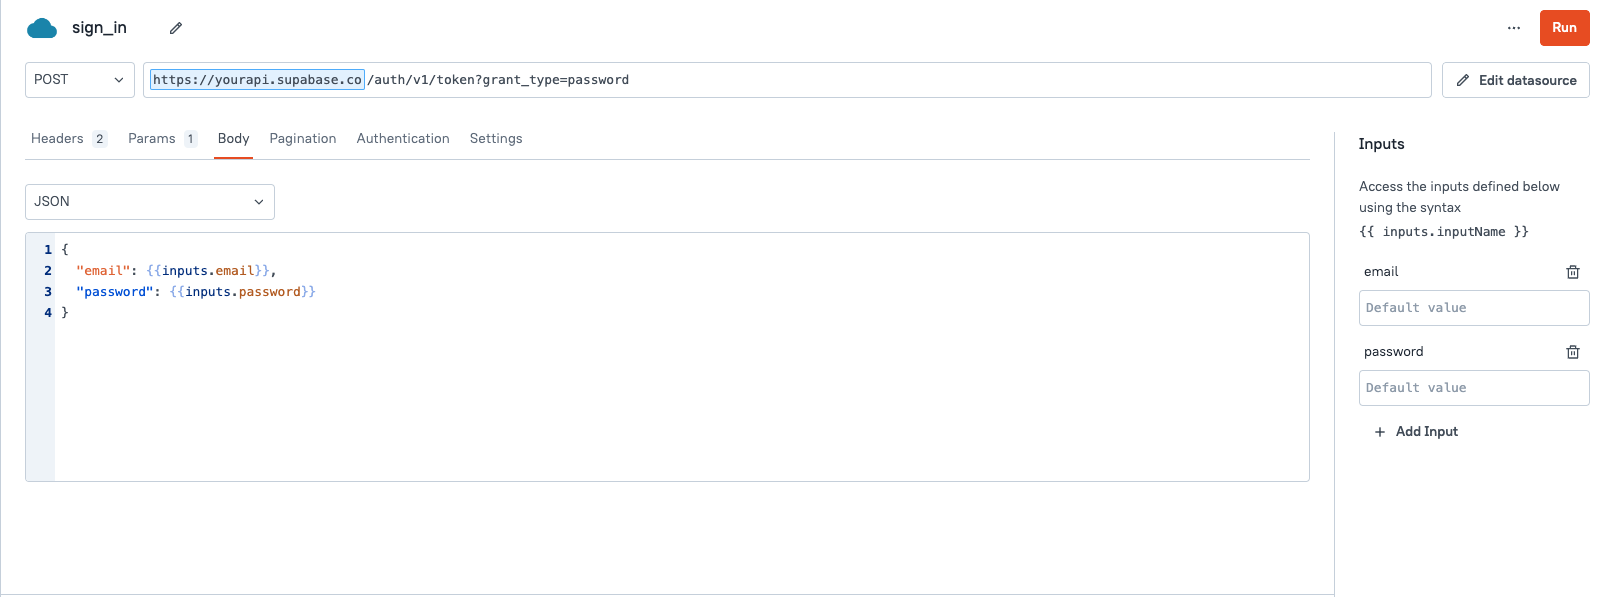
- Create a new query module to authenticate users and retrieve an authentication token:
Example:
//POST METHOD
https://example.api.co/auth/v1/token?grant_type=password
-
Create Inputs from the right-side property pane to dynamically pass user data to the query. For example, create two inputs: one for email and one for password.

-
Pass the user data into your API in the expected format. Use the
inputsproperty to bind the user data.
Example: if the API expects data in JSON format, select Body in the API, and then select JSON. Use the inputs property to bind the data, like:
{
  "email": {{inputs.email}},
  "password": {{inputs.password}}
}
- Create a new JS module to handle the sign-in process by calling the
sign_inAPI query with the providedemailandpassword, storing the response data in local storage, and navigating to theHomepage upon successful authentication.
-
To pass data from the JS module to the query module, you can pass parameters at runtime using
run(), likesign_in.run({ email: email, password: password }). -
To read the JS module data in the query module, create Inputs with the same parameter name, like
emailandpassword.
export default {
    signin: ({ email, password }) => {
        // Call the sign_in API query with the provided email and password
        return sign_in.run({ email: email, password: password })
            .then(data => {
                // Remove the user information from the response data for security reasons
                delete data.user;
                // Store each key-value pair from the response data in the local storage
                Object.keys(data).forEach(i => {
                    storeValue(i, data[i]);
                });
            })
            .then(() =>
                // Navigate to the 'Home' page upon successful authentication
                navigateTo('Home')
            );
    }
};
For any future user actions, use the stored access token to access the relevant API endpoint. If the token has expired, refresh the access token for the user to proceed further. You can use the Appsmith Object and Functions within the JS module code, which can be executed in the App.
- Publish the package.
Integrate custom authentication
Follow these steps to use the login authentication module within your application:
-
Open your App from the homepage and ensure that both the app and modules share the same workspace.
-
Create a simple login form using widgets such as Text and Input fields, tailored to meet your specific requirements.
-
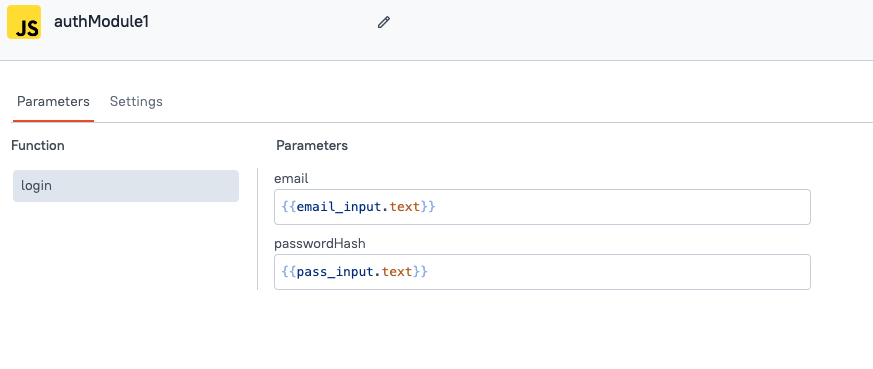
Select the JS tab on the Entity Explorer, add the Login JS module, and pass login form data into function parameters for authentication.
To pass data from the App to a JS module, you can set Inputs parameters or pass it by calling the respective function with parameters, like login(hello@email.com, password@123).

- Set the onClick event of the Submit/Login button to run the JS function.
When the button is clicked, the JS module verifies whether the user's email exists in the database. If the email and password match, it redirects the user to a new page.
To log out a user, call the revoke API to invalidate the access token, use the clear store() action to remove stored user data, and redirect the user to the LoginPage.
Refresh access token
To refresh OAuth tokens across all apps, enabling you to renew and extend your authentication access, follow these steps:
- Create a query module to call the token refresh endpoint provided by your authentication service. For OAuth services, ensure that you add the refresh token in the request payload to receive a new access token.
Example:
https://api.example.io/api/user/token-auth/
- Create a new JS module to refresh the token:
Example:
export default {
    refreshAccessToken: () => {
        // Retrieving the refresh token from the appsmith store
        const refreshToken = appsmith.store.refreshtoken;

        // Checking if a refresh token exists
        if (refreshToken) {
            // Executing the refresh API with the retrieved refresh token
            return refreshAPI.run({ refreshtoken: refreshToken })
                .then(newTokens => {
                    // Updating the access token in the appsmith store
                    storeValue('accesstoken', newTokens.accesstoken);

                    // Checking if a new refresh token is provided and updating it
                    if (newTokens.refreshtoken) {
                        storeValue('refreshtoken', newTokens.refresh_token);
                    }
                })
                .catch(error => {
                    console.log('Error refreshing token:', error);
                });
        }
    }
};
- Create a new query module to handle the generation of tokens when an authentication token expires.
Example:
https://api.example.io/api/user/token-refresh/
In the API configuration, provide the refresh token from the store in the request body:
{
    "refresh_token":{{appsmith.store.authRefreshToken}}
}
- Publish the package.
Now you can use the JS module within your app to fetch details using query or refresh tokens on page load, ensuring continuous authentication access.